Wednesday, April 27, 2011

Toilet Paper Embossing

I've been drooling over the Pink Paislee "Artisan Elements: Frames" since they came out, but sadly I've never been able to snag a package. Gorgeous, no?

image from Pink Paislee

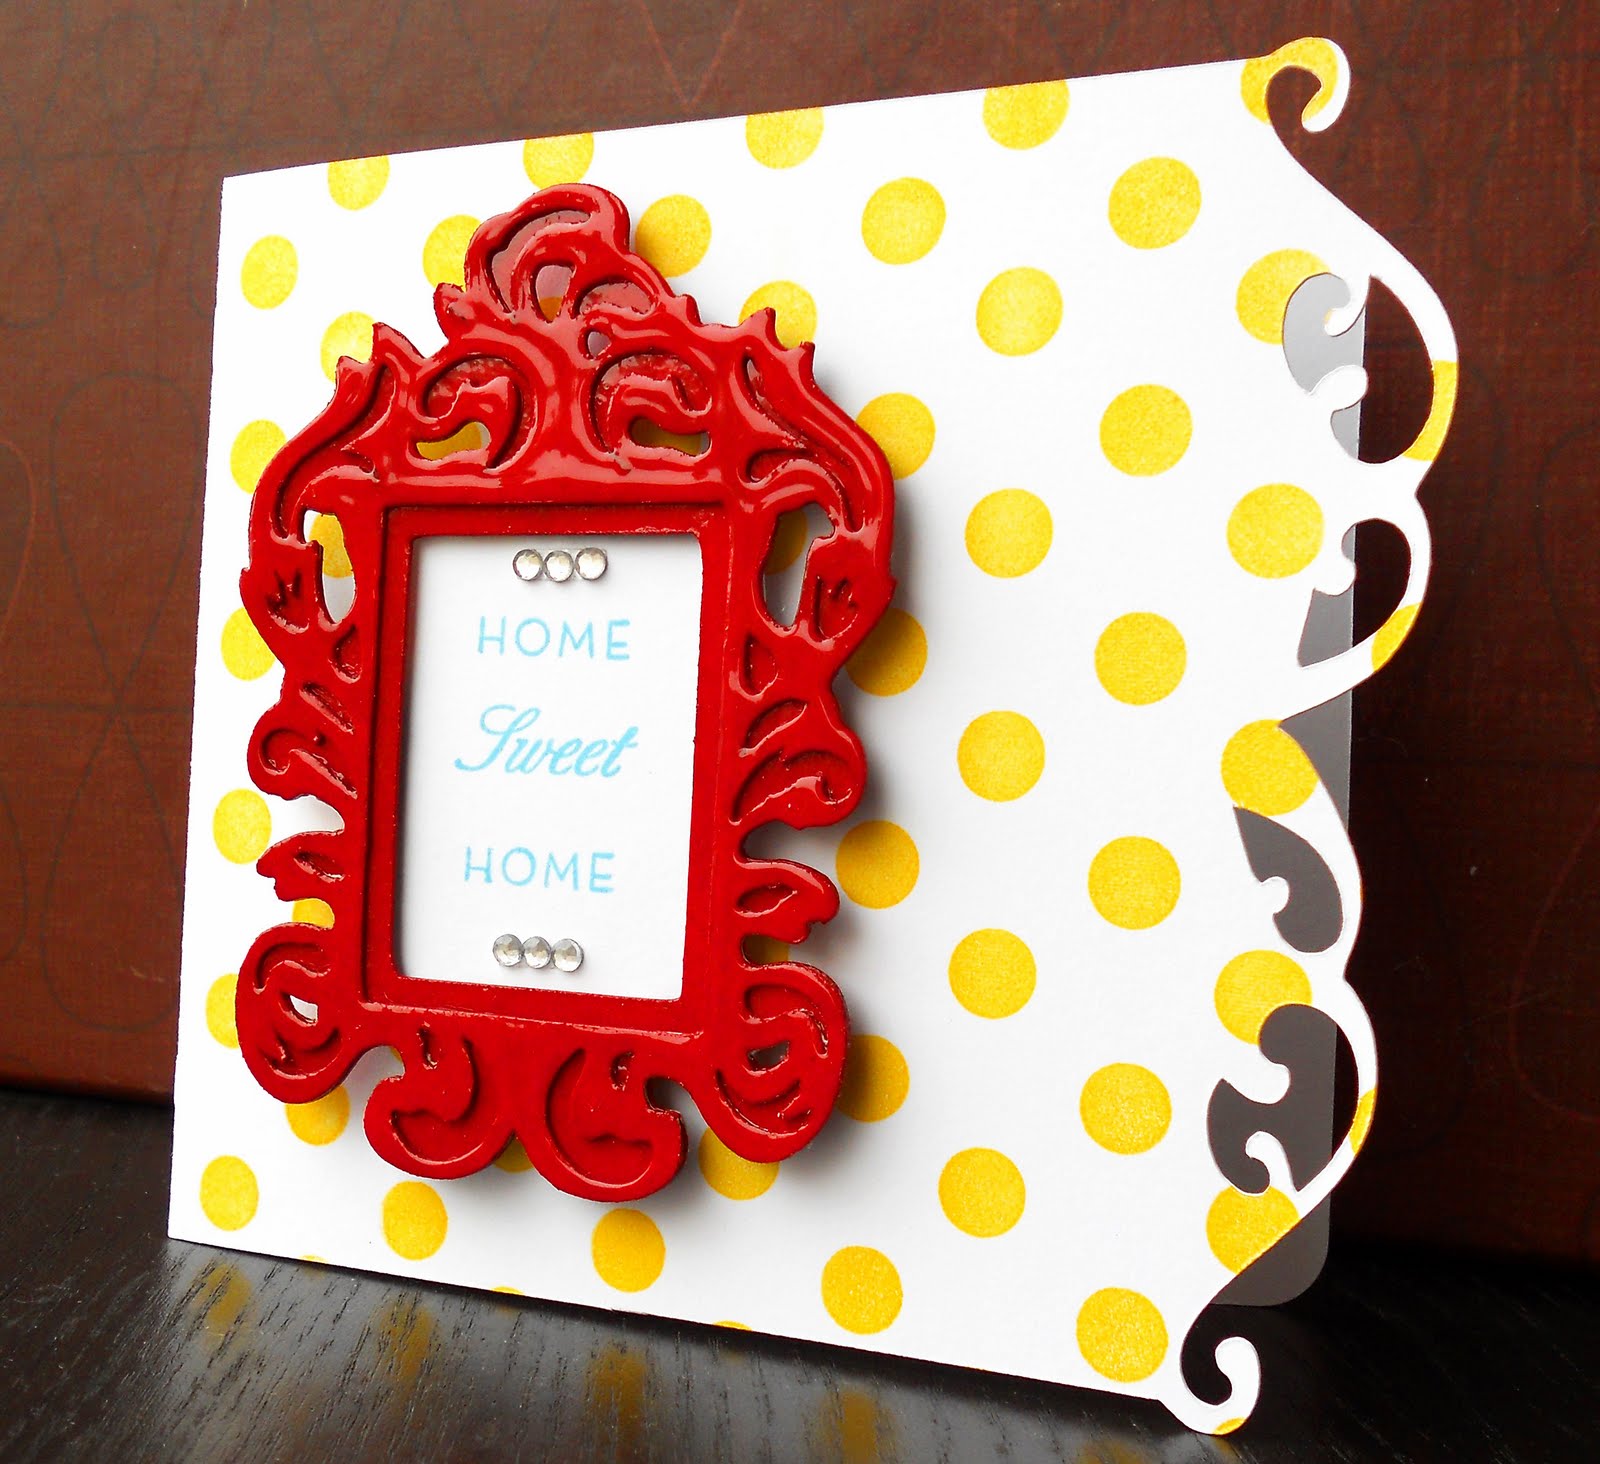
I do, however have their Bayberry Cottage stamp set, which contains an exact match to one of the frames. And I got to thinking: What if I could make my own version? Didn't I read somewhere that you could use wet toilet paper and rubber stamps to make embossed images? A little internet research led me to this step-by-step tutorial, which in turn led to this:


Can you believe that's just toilet paper? I used 6 sheets of 3-ply toilet paper, which resulted in a nice, sturdy piece. After drying for a few hours, I cut out the middle and trimmed around the edges with scissors and a craft knife. I still can't get over how easy it was. Here's a closeup so you can see a bit more of the detail:


It would also be really cool to try this with clay, although I'm not sure I'd have the patience to deal with rolling out the clay, trimming, drying, etc. I think for now I'll stick to the tp method!

Supplies:
Stamps: Pink Paislee "Bayberry Cottage" (frame), Teresa Collins "Posh" (bird), Hero Arts "Everyday Sayings" (sentiment)
Ink: SEI chalk "turquoise", "bordeaux"
Patterned Paper: Basic Grey "Urban Prairie", Prima Marketing "Melody"
Accessories: adhesive rhinestones, foam adhesive, toilet paper


Monday, April 25, 2011

Happy Easter!


Wishing you a wonderful Easter weekend!

Card Supplies:
Stamps: Studio G (sentiment), Impression Obsession (stitches)
Ink: ColorBox pigment "Chestnut", ColorBox chalk "Rose Coral", My Mind's Eye "Sundress" pigment palette, Versamark
Accessories: Cricut / Easter 2010 seasonal cartridge, Cuttlebug / Papertrey Ink Woodgrain impression plate, Sakura Souffle pen #907, corner rounder punch, foam adhesive

Wednesday, April 20, 2011

Damask Gift Card Holder

One of the things on my (ever-growing) to-do list of projects has been the gift-card holders from the Cricut Wild Card cartridge. Unfortunately, giftcards aren't as prevalent here in China as they are in America, so that idea has had to simmer on the back burner. That is, until I saw the Gift Card Holder Challenge over at Moxie Fab World. 


I cut the holder from watercolor paper at 4 1/2" (Real Dial Size), and the liner at 3 1/2" (Real Dial Size). After stamping the liner, I scored it horizontally 2 1/2" from the bottom and adhered it to the inside of the holder, lining up the fold of the liner with the fold of the top flap. Next, I assembled the rest of the holder using super-sticky double-sided tape. 


I kept the outside simple, just adding a stamped label attached with foam adhesive. And here's a shot with a gift card inside (okay, I confess, it's actually a food-court swipe card!):


These little holders are super-easy to make with the Cricut. I'll definitely be making a batch of these the next time we're Stateside for Christmas!

(I know my last few posts have been Cricut-heavy, but hubby was starting to wonder if I was ever going to actually use the expensive gadget he got me for Christmas. And I have to say, I've been having lots of fun coming up with ways to incorporate it into my card-making routine!)


Supplies:
Stamps: American Crafts "Letterbox Large Enjoy" (frame/sentiment), Teresa Collins "Posh" (damask); Ink: ColorBox pigment "Rouge", My Mind's Eye "Natural" pigment palette; Cardstock: watercolor paper; Accessories: Cricut / Wild Card cartridge, foam adhesive

Monday, April 18, 2011

Rainbow 3x3 Set

I've been playing around with my Cricut all weekend, and I whipped up this little set of cards, cut from the Sentimentals cartridge at 3". Even though this particular cartridge has a distinct Victorian feel, I love that I was able to use it to create a more modern look.


I took the leftover cut-out hearts, added some stamped script, then swapped them between the cards. I adhered them to the inside of each card by applying glue to the backside of the heart, holding the card closed on a flat surface,  and inserting the heart back into the heart-shaped window for placement. Easy peasy!


I cut an envelope for each card (again using the Sentimentals cartridge - cut at Real Dial Size, 4") from a large kraft shipping envelope (more pliable than kraft cardstock). I assembled the envelopes using super-sticky double-sided tape, and added a strip on the top flap (protective backing left on) to use for sealing the envelope.


The icing on the cake is this adorable little box I made using kraft cardstock and the Wild Card cartridge (cut at 5 1/4"). See how they all fit in there perfectly?


Here's how it looks all put together:


{Love}. I am such a sucker for cute little boxes and bags and such. There's a pillow box on the 2010 Easter cartridge that I've got big plans for...

This set also happens to qualify for the 350 Cards & Gifts Week: The Card Sets Challenge at Moxie Fab World. Head on over and check out the other entries!

Supplies:
Stamps: Teresa Collins "Posh" (script); Ink: SEI chalk "Charcoal"; Cardstock: American Crafts "Tropicals", kraft, kraft shipping envelope; Accessories: Cricut / Sentimentals cartridge / Wild Card cartridge, super-sticky double-sided tape

Saturday, April 16, 2011

Tuesday Trigger Challenge: Porch Play

Seriously, how could I resist playing along with this week's Tuesday Trigger over at Moxie Fab World? I mean, look at this gorgeousness:


That amazing mirror, the bright colors... yes, please! Not to mention another chance to play around with my Cricut. 

First, I diecut a frame and its layer out of leftover cereal box (yes, the Cricut can cut chipboard!) using the Sentimentals cartridge, then added this:


And ended up with this:


The edged cardbase is another cut from the Sentimentals cartridge. 

The best part? My DIY frame is actually a magnet!


I simply attached it to the cardfront with glue dots for easy removal.


I had SO much fun making this card. I love it so much, I might not be able to give this one away!

Card Supplies:
Stamps: American Crafts "Letterbox Small Thanks", Papertrey Ink "Polka Dot Basics", Ink: ColorBox pigment "Aqua", SEI chalk "Cumquats"; Accessories: Cricut / Sentimentals cartridge, cereal box, OPI nail polish, Ranger Glossy Accents, adhesive rhinestones, foam adhesive, adhesive magnets, glue dots

Thursday, April 14, 2011

Diecut Damask

Spring is (finally) in the air, and I'm feeling the urge to spruce up and redecorate. While I think a funky pink (or orange!) damask chair would be the perfect piece to add to our home, that's not really Seth's speed. At all. So, I'll have to content myself with this:


Yes, this will have to do. At least this way I can make the upholstery any color I want...

Card Supplies:
Stamps: American Crafts "Small Thanks", Stampin Up "So Many Sayings"; Ink: ColorBox pigment "Razzberry", My Mind's Eye pigment "Natural" palette; Accessories: Cricut / Sentimentals cartridge, foam adhesive

Sunday, April 10, 2011

Tuesday Trigger Challenge: A Burst of Blooms

I've been trying to use my Cricut more; I've got an idea list a mile long, but I just haven't had a chance to implement much of it. Then I saw this week's Tuesday Trigger over at Moxie Fab World:


And I knew I had to make this:


 I used the Don Juan Cricut cartridge's "Stitched" option to create my own "sewing card." The initial holes were WAY too small, so I went back over them using a paper piercer and foam mat. After that it was just a matter of stitching up the design (while watching a couple of episodes of How I Met Your Mother). It was a little more time-consuming than the cards I usually make, but I really enjoyed making it - there's just something so relaxing about working with a needle and thread!

Card Supplies:
Ink: Ranger Distress Ink (Antique Linen); Accessories: Cricut / Don Juan cartridge, Cuttlebug / Distressed Stripes embossing folder, corner rounder punch, embroidery floss, foam tape

Wednesday, April 6, 2011

Mustaches & Sunshine

I don't know about you, but I'm ready for spring to finally make up its mind and stick around. This schizophrenic weather is driving me nuts! I tried to channel some warm weather vibes with this card:


The moment I saw these adorable mustache stamps, I knew I had to add them to my collection. My hubby Seth has had a goatee for almost as long as I've known him (he even won a goatee contest in college), and my grandpa sported a handlebar mustache (with wax and everything!) for years. I guess you could say I've got a soft spot for the facial hair.

My inspiration was the plethora of "mustache on a stick" photobooth props I've been seeing all over the blogosphere. I simply cut a disposable chopstick down to size (we have a bazillion of those things floating around the kitchen - go figure!), taped it to the back of my stamped mustache, and attached it all to the cardfront with foam adhesive and some Tombow mono-multi. Fun, huh? I can tell I'm going to have a blast with this set!

Card Supplies:
Stamps: My Cute Stamps "Mustaches"; American Crafts "Sing Along" (sentiment); Ink: black pigment; Accessories: small corner rounder punch, foam adhesive